感谢广告商招租对本博客的的大力赞助。 创作不易,如果您觉得有帮助,请 支持LIncol29! 为了让我能够继续创作更好的内容,你也可以选择订阅博客的 VIP ,包年VIP仅需10元/年,所有VIP内容免费观看
日志
2025-07-19:解决MainWindow.xaml无法引用 ReactiveWindow问题。
ReactiveUI 介绍
文档:https://www.reactiveui.net/
github 代码:https://github.com/reactiveui/reactiveui
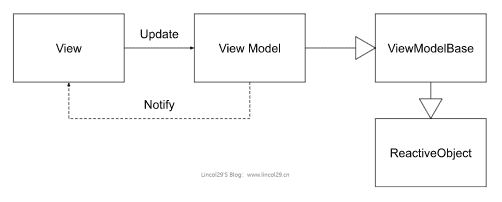
为什么要使用 ReactiveUI。大部分 MVVM 模式都套用此框架,优点:节省自己书写 INotifyProperty 接口,以及 View 中对 Command 的绑定。
如果你还不了解MVVM模式,可以参考此文章:[WPF之MVVM模式详解](https://www.lincol29.cn/wpf-mvvm)
ReactiveUI makes it easy to combine the MVVM pattern with Reactive Programming by providing features such as:
一旦您安装并配置了_ReactiveUI_,您可以将您的视图模型基于这个类:
public class ViewModelBase : ReactiveObject
{
}
实现案例
https://www.reactiveui.net/docs/getting-started/compelling-example
中文版本(winform)
1、创建 VS 项目,选择 Winform 应用
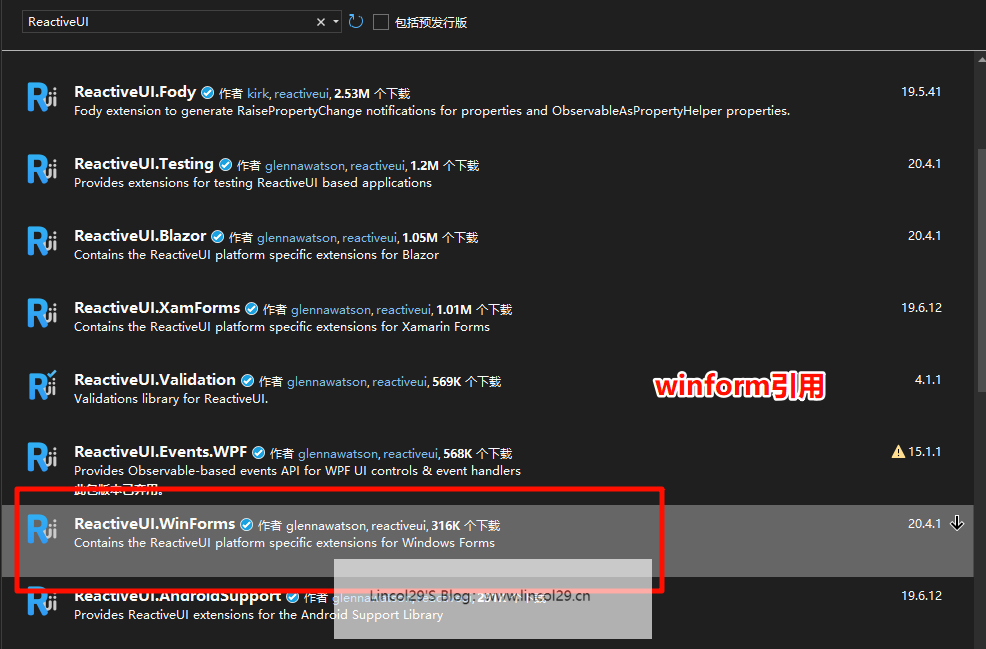
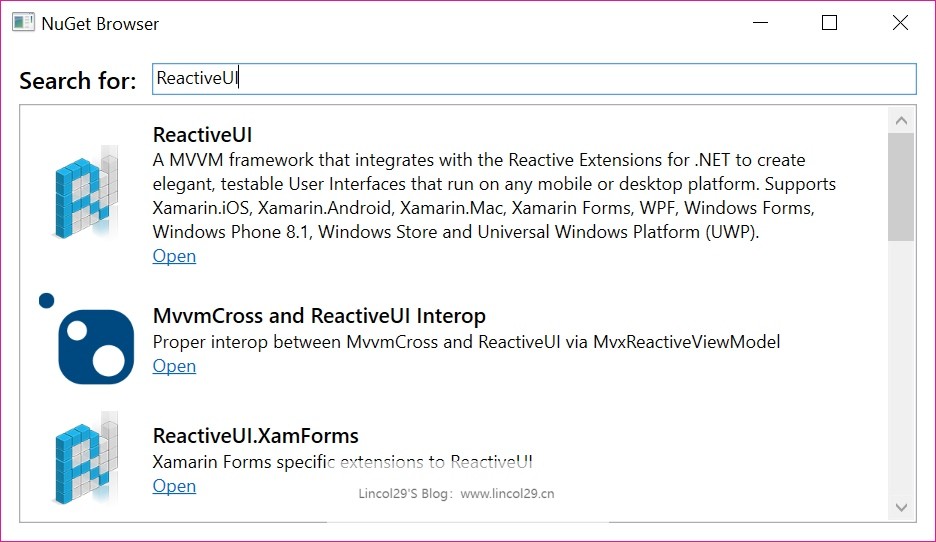
2、从 nuget 中导入 ReactiveUI 包
项目创建完成后,鼠标右键单击当前项目,选择“管理NuGet程序包”,在打开的窗口中选择“浏览”,并搜索ReactiveUI。
3、创建 ViewModel,新建一个 UserViewModel,此类需继承 ReactiveObject
如果属性需要更新,需要在 set 中 this.RaiseAndSetIfChanged(ref _Name, value); 比较新值与旧值,如不相同则会更新。
//引用ReactiveUI包
using ReactiveUI;
namespace WinFormDemo
{
//继承ReactiveObject
public class UserViewModel : ReactiveObject
{
private string _Name;
private int _Age;
private string _Sex;
public UserViewModel()
{
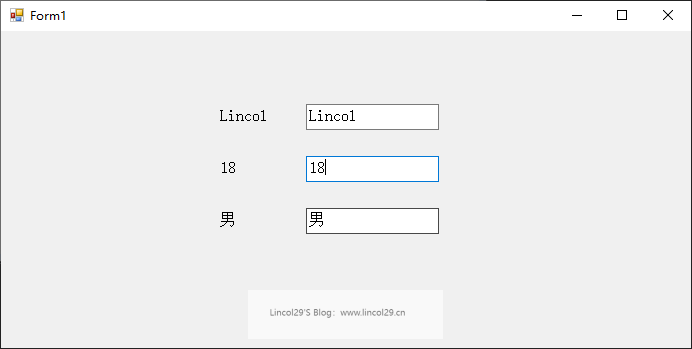
Name = "Lincol";
Age = 18;
Sex = "男";
}
public string Name
{
get { return _Name; }
set
{
//更新属性值
this.RaiseAndSetIfChanged(ref _Name, value);
}
}
public int Age
{
get { return _Age; }
set { this.RaiseAndSetIfChanged(ref _Age, value); }
}
public string Sex
{
get { return _Sex; }
set { this.RaiseAndSetIfChanged(ref _Sex, value); }
}
}
}
4、Form 窗口类需继承 IViewFor<泛型为定义的 ViewModel>,ReactiveUI 可以识别这个窗体与哪个 ViewModel 绑定
using ReactiveUI;
using System.Reactive.Disposables;
using System.Windows.Forms;

namespace WinFormDemo
{
    //继承IViewFor<UserViewModel> ,填写VM泛型名
    public partial class MainForm : Form, IViewFor<UserViewModel>
    {
        public MainForm()
        {
            InitializeComponent();
            //创建ViewModel实例
            ViewModel = new UserViewModel();
            this.WhenActivated(dispose =>
               {
                   //Bind为双向绑定,OneWayBind为单向绑定:vm->v
                   this.Bind(ViewModel, vm => vm.Name, v => v.textBox1.Text).DisposeWith(dispose);
                   this.Bind(ViewModel, vm => vm.Age, v => v.textBox2.Text).DisposeWith(dispose);
                   this.Bind(ViewModel, vm => vm.Sex, v => v.textBox3.Text).DisposeWith(dispose);
                   this.Bind(ViewModel, vm => vm.Name, v => v.label1.Text).DisposeWith(dispose);
                   this.Bind(ViewModel, vm => vm.Age, v => v.label2.Text).DisposeWith(dispose);
                   this.Bind(ViewModel, vm => vm.Sex, v => v.label3.Text).DisposeWith(dispose);
               });
        }

        object IViewFor.ViewModel
        {
            get => ViewModel;
            set => ViewModel = (UserViewModel)value;
        }

        public UserViewModel ViewModel { get; set; }
    }
}
构造函数中WhenActivated里的代码即为绑定相关。this.Bind表示双向绑定,this.OneWayBind表示单向绑定:ViewModel 属性变化,自动更新到 View。
中文版本(wpf)
为了方便对比,我们直接使用[WPF之MVVM模式详解](https://www.lincol29.cn/wpf-mvvm) 的代码进行改造。
创建 VS 项目
选择 WPF 应用,框架选择 .net 8
从 nuget 中导入 ReactiveUI 包
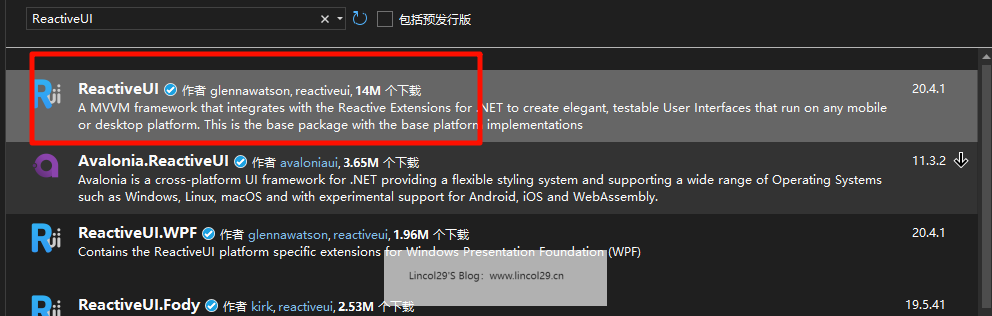
项目创建完成后,鼠标右键单击当前项目,选择“管理NuGet程序包”,在打开的窗口中选择“浏览”,并搜索ReactiveUI
wpf 引用这个ReactiveUI \ ReactiveUI.WPF \ ReactiveUI.Fody三个包
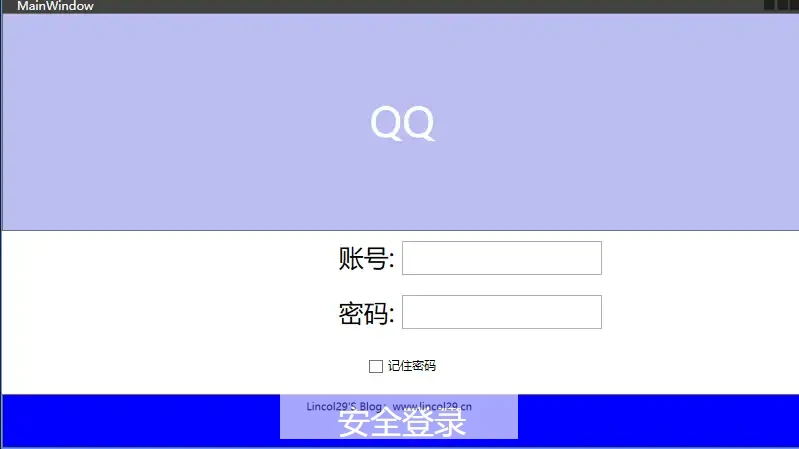
前端界面
将 Text=”{Binding UserName}” 修改为 ReactiveUI使用 x;Name=”UserName”。代码如下:
主要让控件拥有一个 Name,方便后续的MainWindow.xaml.cs找到Name进行绑定。
Text的字段和Button的命令都是同样操作。

<Grid>
    <Grid.RowDefinitions>
        <RowDefinition/>
        <RowDefinition/>
    </Grid.RowDefinitions>
    <Button Content="QQ" FontSize="40" Foreground="White" Background="#BABEF2"/>
    <Grid Grid.Row="1">
        <Grid.RowDefinitions>
            <RowDefinition/>
            <RowDefinition/>
            <RowDefinition/>
            <RowDefinition/>
        </Grid.RowDefinitions>
        <Grid.ColumnDefinitions>
            <ColumnDefinition/>
            <ColumnDefinition/>
        </Grid.ColumnDefinitions>
        <TextBlock Grid.Row="0" Grid.Column="0"   Text="账号: " FontSize="25" VerticalAlignment="Center" HorizontalAlignment="Right"/>
        <!--Text 绑定字段:UserName    ReactiveUI使用 x;Name="UserName"-->
        <TextBox Grid.Row="0" Grid.Column="1" x:Name="txt_UserName" FontSize="25" VerticalAlignment="Center" Width="200" HorizontalAlignment="Left"/>
        <TextBlock Grid.Row="1" Grid.Column="0" Text="密码: " FontSize="25" VerticalAlignment="Center" HorizontalAlignment="Right"/>
        <!--Text 绑定字段:Password    ReactiveUI使用 x;Name="Password"    -->
        <TextBox Grid.Row="1" Grid.Column="1" x:Name="txt_pwd" FontSize="25" VerticalAlignment="Center" Width="200" HorizontalAlignment="Left" />
        <CheckBox Grid.Row="2" Grid.ColumnSpan="2" Content="记住密码" VerticalAlignment="Center" HorizontalAlignment="Center"/>
        <!-- 绑定命令:Command  使用命令代替了原本的Button按钮点击事件   ReactiveUI使用 x;Name="LoginAction"-->
        <Button Grid.Row="3" Grid.ColumnSpan="2" Content="安全登录" x:Name="LoginAction"  FontSize="32" Foreground="White" Background="Blue"/>
    </Grid>
</Grid>
创建 UserViewModel
此类需继承 ReactiveObject
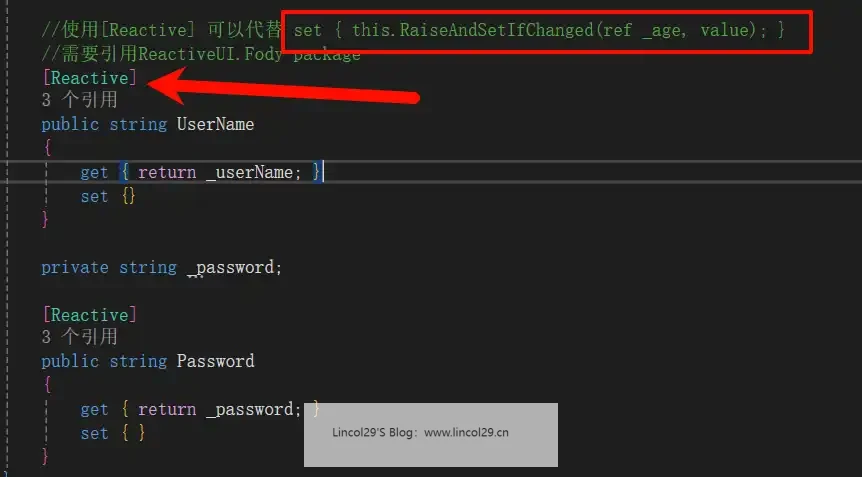
引用ReactiveUI.Fody package后可以使用[Reactive] 代替 set { this.RaiseAndSetIfChanged(ref _age, value); }
需要声明命令属性:public ReactiveCommand
在构造函数中,调用命令。
public UserViewModel() {
    LoginAction = ReactiveCommand
        .Create(() =>
        {
            // 命令执行时的逻辑
            if(UserName == "lincol" && Password == "123")
            {
                MessageBox.Show("Login Successful!");
            }
            else
            {
                MessageBox.Show("Login Failed!");
                UserName = string.Empty;
                Password = string.Empty;
            }
        });
}
#region << Lincol29 https://www.lincol29.cn>>
/*----------------------------------------------------------------
 * 版权所有 (c) 2025  NJRN 保留所有权利。
 * CLR版本:4.0.30319.42000
 * 命名空间:ReactiveDemo.ViewModels
 * 文件名:UserViewModel
 *
 * 创建者:Lincol29
 * 电子邮箱:[email protected]
 * 个人Blog:https://www.lincol29.cn
 * 创建时间:2025/7/18 11:04:37
 *----------------------------------------------------------------*/
#endregion << Lincol29 https://www.lincol29.cn >>

using ReactiveUI;
using ReactiveUI.Fody.Helpers;
using System.Reactive;
using System.Windows;

namespace ReactiveDemo.ViewModels
{
    public class UserViewModel:ReactiveObject
    {
        //声明命令属性
        public ReactiveCommand<Unit, Unit> LoginAction { get; }

        public UserViewModel() {
            LoginAction = ReactiveCommand
                .Create(() =>
                {
                    // 命令执行时的逻辑
                    if(UserName == "lincol" && Password == "123")
                    {
                        MessageBox.Show("Login Successful!");
                    }
                    else
                    {
                        MessageBox.Show("Login Failed!");
                        UserName = string.Empty;
                        Password = string.Empty;
                    }
                });
        }

        private string _userName;

        //使用[Reactive] 可以代替 set { this.RaiseAndSetIfChanged(ref _age, value); }
        //需要引用ReactiveUI.Fody package
        [Reactive]
        public string UserName
        {
            get { return _userName; }
            set {}
        }

        private string _password;

        [Reactive]
        public string Password
        {
            get { return _password; }
            set { }
        }
    }
}
MainWindow.xaml.cs
实现接口 IViewFor<泛型,输入你的ViewModel> ,实现接口书写方法 ViewModel和 IViewFor.ViewModel
视图构造函数中WhenActivated里的代码即为绑定相关。this.Bind表示双向绑定,this.OneWayBind表示单向绑定。
this.BindCommand 为绑定命令
using ReactiveDemo.ViewModels;
using ReactiveUI;
using System.Reactive.Disposables;
using System.Windows;

namespace ReactiveDemo
{
    /// <summary>
    /// Interaction logic for MainWindow.xaml
    /// </summary>
    public partial class MainWindow : Window, IViewFor<UserViewModel>
    {
        public MainWindow()
        {
            InitializeComponent();
            ViewModel = new UserViewModel();
            this.WhenActivated(dispose =>
            {
                this.Bind(ViewModel, vm => vm.UserName, v => v.txt_UserName.Text).DisposeWith(dispose);
                this.Bind(ViewModel, vm => vm.Password, v => v.txt_pwd.Text).DisposeWith(dispose);
                this.BindCommand(ViewModel,vm =>vm.LoginAction,v => v.LoginAction).DisposeWith(dispose);
            });
        }

        public UserViewModel? ViewModel { get; set; }
        object? IViewFor.ViewModel { get => ViewModel; set => ViewModel = (UserViewModel)value; }
    }
}
英文版本
1. Create the project
In Visual Studio, create a new WPF application (.NET 4.6.2 or above), use <font style="color:rgb(214, 51, 132);">ReactiveDemo</font> app name. Our view has been already created for us, the <font style="color:rgb(214, 51, 132);">MainWindow</font>, so we will proceed with creating our ViewModel.
2. Add NuGet packages
Install-Package ReactiveUI.WPF
The complete list containing NuGet packages for all supported platforms can be found here. ReactiveUI main package should normally be installed into you .NET Standard class libraries containing platform-agnostic code (repositories, services, DTOs, view-models), and <font style="color:rgb(214, 51, 132);">ReactiveUI.XXX</font> packages are platform-specific, so we use ReactiveUI.WPF in this tutorial as we are developing a tiny WPF application that doesn’t need code sharing.
Install-Package NuGet.Protocol
We also need a NuGet client library in this tutorial, and we are going to install and use NuGet Client.
3. Create ViewModels
// AppViewModel is where we will describe the interaction of our application.
// We can describe the entire application in one class since it's very small now.
// Most ViewModels will derive off ReactiveObject, while most Model classes will
// most derive off INotifyPropertyChanged
public class AppViewModel : ReactiveObject
{
    // In ReactiveUI, this is the syntax to declare a read-write property
    // that will notify Observers, as well as WPF, that a property has
    // changed. If we declared this as a normal property, we couldn't tell
    // when it has changed!
    private string _searchTerm;
    public string SearchTerm
    {
        get => _searchTerm;
        set => this.RaiseAndSetIfChanged(ref _searchTerm, value);
    }

    // Here's the interesting part: In ReactiveUI, we can take IObservables
    // and "pipe" them to a Property - whenever the Observable yields a new
    // value, we will notify ReactiveObject that the property has changed.
    //
    // To do this, we have a class called ObservableAsPropertyHelper - this
    // class subscribes to an Observable and stores a copy of the latest value.
    // It also runs an action whenever the property changes, usually calling
    // ReactiveObject's RaisePropertyChanged.
    private readonly ObservableAsPropertyHelper<IEnumerable<NugetDetailsViewModel>> _searchResults;
    public IEnumerable<NugetDetailsViewModel> SearchResults => _searchResults.Value;

    // Here, we want to create a property to represent when the application
    // is performing a search (i.e. when to show the "spinner" control that
    // lets the user know that the app is busy). We also declare this property
    // to be the result of an Observable (i.e. its value is derived from
    // some other property)
    private readonly ObservableAsPropertyHelper<bool> _isAvailable;
    public bool IsAvailable => _isAvailable.Value;

    public AppViewModel()
    {
        // Creating our UI declaratively
        //
        // The Properties in this ViewModel are related to each other in different
        // ways - with other frameworks, it is difficult to describe each relation
        // succinctly; the code to implement "The UI spinner spins while the search
        // is live" usually ends up spread out over several event handlers.
        //
        // However, with ReactiveUI, we can describe how properties are related in a
        // very organized clear way. Let's describe the workflow of what the user does
        // in this application, in the order they do it.

        // We're going to take a Property and turn it into an Observable here - this
        // Observable will yield a value every time the Search term changes, which in
        // the XAML, is connected to the TextBox.
        //
        // We're going to use the Throttle operator to ignore changes that happen too
        // quickly, since we don't want to issue a search for each key pressed! We
        // then pull the Value of the change, then filter out changes that are identical,
        // as well as strings that are empty.
        //
        // We then do a SelectMany() which starts the task by converting Task<IEnumerable<T>>
        // into IObservable<IEnumerable<T>>. If subsequent requests are made, the
        // CancellationToken is called. We then ObserveOn the main thread,
        // everything up until this point has been running on a separate thread due
        // to the Throttle().
        //
        // We then use an ObservableAsPropertyHelper, OAPH, and the ToProperty() method to allow
        // us to have the latest results that we can expose through the property to the View.
        _searchResults = this
            .WhenAnyValue(x => x.SearchTerm)
            .Throttle(TimeSpan.FromMilliseconds(800))
            .Select(term => term?.Trim())
            .DistinctUntilChanged()
            .Where(term => !string.IsNullOrWhiteSpace(term))
            .SelectMany(SearchNuGetPackages)
            .ObserveOn(RxApp.MainThreadScheduler)
            .ToProperty(this, x => x.SearchResults);

        // We subscribe to the "ThrownExceptions" property of our OAPH, where ReactiveUI
        // marshals any exceptions that are thrown in SearchNuGetPackages method.
        // See the "Error Handling" section for more information about this.
        _searchResults.ThrownExceptions.Subscribe(error => { /* Handle errors here */ });

        // A helper method we can use for Visibility or Spinners to show if results are available.
        // We get the latest value of the SearchResults and make sure it's not null.
        _isAvailable = this
            .WhenAnyValue(x => x.SearchResults)
            .Select(searchResults => searchResults != null)
            .ToProperty(this, x => x.IsAvailable);
    }

    // Here we search NuGet packages using the NuGet.Client library. Ideally, we should
    // extract such code into a separate service, say, INuGetSearchService, but let's
    // try to avoid overcomplicating things at this time.
    private async Task<IEnumerable<NugetDetailsViewModel>> SearchNuGetPackages(
        string term, CancellationToken token)
    {
        var providers = new List<Lazy<INuGetResourceProvider>>();
        providers.AddRange(Repository.Provider.GetCoreV3()); // Add v3 API support
        var packageSource = new PackageSource("https://api.nuget.org/v3/index.json");
        var source = new SourceRepository(packageSource, providers);
        ILogger logger = NullLogger.Instance;

        var filter = new SearchFilter(false);
        var resource = await source.GetResourceAsync<PackageSearchResource>().ConfigureAwait(false);
        var metadata = await resource.SearchAsync(term, filter, 0, 10, logger, token).ConfigureAwait(false);
        return metadata.Select(x => new NugetDetailsViewModel(x));
    }
}
The goal of the ReactiveUI syntax for read-write properties is to notify Observers that a property has changed. Otherwise we would not be able to know when it was changed.
In cases when we don’t need to provide for two-way binding between the View and the ViewModel, we can use one of many ReactiveUI Helpers, to notify Observers of a changing read-only value in the ViewModel. We use the ObservableAsPropertyHelper twice, once to turn a generic IEnumerable into an observable read-only collection, and then to change the visibility of an indicator to show that a request is currently executing.
This also works in the opposite direction, when we take the <font style="color:rgb(214, 51, 132);">SearchTerm</font> property and turn it into an observable. This means that we are notified every time a change occurs in the UI. Using Reactive Extensions, we then throttle those events, and ensure that the search occurs no sooner than 800ms after the last keystroke. And if at that point the user did not change the last value, or if the search term is blank, we ignore the event completely. We have another ObservableAsPropertyHelper property <font style="color:rgb(214, 51, 132);">IsAvailable</font> which is generated by determining if our current SearchResults is null.
Let’s now create a <font style="color:rgb(214, 51, 132);">NugetDetailsViewModel.cs</font> class that will wrap our NuGet metadata into a more usable class for our View. It includes a ReactiveCommand for opening the NuGet Repository URL.
// This class wraps our NuGet model object into a ViewModel and allows
// us to have a ReactiveCommand to open the NuGet package URL.
public class NugetDetailsViewModel : ReactiveObject
{
    private readonly IPackageSearchMetadata _metadata;
    private readonly Uri _defaultUrl;

    public NugetDetailsViewModel(IPackageSearchMetadata metadata)
    {
        _metadata = metadata;
        _defaultUrl = new Uri("https://git.io/fAlfh");
        OpenPage = ReactiveCommand.Create(() =>
                                          {
                                              Process.Start(new ProcessStartInfo(this.ProjectUrl.ToString())
                          {
                              UseShellExecute = true
                              });
                                          });
    }

    public Uri IconUrl => _metadata.IconUrl ?? _defaultUrl;
    public string Description => _metadata.Description;
    public Uri ProjectUrl => _metadata.ProjectUrl;
    public string Title => _metadata.Title;

    // ReactiveCommand allows us to execute logic without exposing any of the
    // implementation details with the View. The generic parameters are the
    // input into the command and its output. In our case we don't have any
    // input or output so we use Unit which in Reactive speak means a void type.
    public ReactiveCommand<Unit, Unit> OpenPage { get; }
}
4. Create Views
ReactiveUI allows you to create views using two different approaches. The recommended approach is using type-safe ReactiveUI bindings that can save you from memory leaks and runtime errors. The second approach is using XAML markup bindings.
Create Views using ReactiveUI type-safe bindings (recommended)
First, we need to register our views in the <font style="color:rgb(214, 51, 132);">App.xaml.cs</font> file.
public partial class App
{
    public App()
    {
        // A helper method that will register all classes that derive off IViewFor
        // into our dependency injection container. ReactiveUI uses Splat for it's
        // dependency injection by default, but you can override this if you like.
        Locator.CurrentMutable.RegisterViewsForViewModels(Assembly.GetCallingAssembly());
    }
}
Then we declare the XAML for our Main Window.
<reactiveui:ReactiveWindow
    x:Class="ReactiveDemo.MainWindow"
        x:TypeArguments="reactivedemo:AppViewModel"
            xmlns="http://schemas.microsoft.com/winfx/2006/xaml/presentation"
            xmlns:x="http://schemas.microsoft.com/winfx/2006/xaml"
                xmlns:d="http://schemas.microsoft.com/expression/blend/2008"
                    xmlns:mc="http://schemas.openxmlformats.org/markup-compatibility/2006"
                        xmlns:reactivedemo="clr-namespace:ReactiveDemo"
                            xmlns:reactiveui="http://reactiveui.net"
                                Title="NuGet Browser" Height="450" Width="800"
                                mc:Ignorable="d">
    <Grid Margin="12">
        <Grid.ColumnDefinitions>
            <ColumnDefinition Width="Auto" />
                                    <ColumnDefinition Width="*" />
                                    </Grid.ColumnDefinitions>
        <Grid.RowDefinitions>
            <RowDefinition Height="Auto" />
                                    <RowDefinition Height="*" />
                                    </Grid.RowDefinitions>
        <TextBlock FontSize="16" FontWeight="SemiBold"
                                    VerticalAlignment="Center" Text="Search for: "/>
        <TextBox Grid.Column="1" Margin="6 0 0 0" x:Name="searchTextBox" />
            <ListBox x:Name="searchResultsListBox" Grid.ColumnSpan="3"
                Grid.Row="1" Margin="0,6,0,0" HorizontalContentAlignment="Stretch"
                ScrollViewer.HorizontalScrollBarVisibility="Disabled" />
                </Grid>
</reactiveui:ReactiveWindow>
We need to derive the MainWindow from <font style="color:rgb(214, 51, 132);">IViewFor<T></font>, so we use <font style="color:rgb(214, 51, 132);">ReactiveWindow<TViewModel></font> base class.
Note If there is no reactive base class for your view control that can suite you, simply implement the IViewFor interface by hand. Remember to store the ViewModel in a DependencyProperty or in a BindableProperty. See Data Binding for platform-specific examples.
We are going to use ReactiveUI Binding to bind our ViewModel to our View. Reactive binding is a cross platform way of consistently binding properties on your ViewModel to controls on your View. The ReactiveUI binding has a few advantages over the XAML based binding. The first advantage is that property name changes will generate a compile error rather than runtime errors.
// MainWindow class derives off ReactiveWindow which implements the IViewFor<TViewModel>
// interface using a WPF DependencyProperty. We need this to use WhenActivated extension
// method that helps us handling View and ViewModel activation and deactivation.
public partial class MainWindow
{
    public MainWindow()
    {
        InitializeComponent();
        ViewModel = new AppViewModel();

        // We create our bindings here. These are the code behind bindings which allow
        // type safety. The bindings will only become active when the Window is being shown.
        // We register our subscription in our disposableRegistration, this will cause
        // the binding subscription to become inactive when the Window is closed.
        // The disposableRegistration is a CompositeDisposable which is a container of
        // other Disposables. We use the DisposeWith() extension method which simply adds
        // the subscription disposable to the CompositeDisposable.
        this.WhenActivated(disposableRegistration =>
        {
            // Notice we don't have to provide a converter, on WPF a global converter is
            // registered which knows how to convert a boolean into visibility.
            this.OneWayBind(ViewModel,
                viewModel => viewModel.IsAvailable,
                view => view.searchResultsListBox.Visibility)
                .DisposeWith(disposableRegistration);

            this.OneWayBind(ViewModel,
                viewModel => viewModel.SearchResults,
                view => view.searchResultsListBox.ItemsSource)
                .DisposeWith(disposableRegistration);

            this.Bind(ViewModel,
                viewModel => viewModel.SearchTerm,
                view => view.searchTextBox.Text)
                .DisposeWith(disposableRegistration);
        });
    }
}
Reactive Binding allows you to modify the ViewModel property by using Binding Converters. These Binding Converters are able to be registered globally or they can be declared locally. We are going to use Binding Converters in two instances, firstly we have a global converter registered by default on XAML projects that converts a boolean to Visibility, and the second to convert our project URL into a BitmapImage locally one.
We are now going to create a view for our <font style="color:rgb(214, 51, 132);">NugetDetailsViewModel</font>. Create a new <font style="color:rgb(214, 51, 132);">UserControl</font> named <font style="color:rgb(214, 51, 132);">NugetDetailsView</font> and change it’s XAML to the following:
<reactiveui:ReactiveUserControl
  x:Class="ReactiveDemo.NugetDetailsView"
  xmlns:reactiveDemo="clr-namespace:ReactiveDemo"
  x:TypeArguments="reactiveDemo:NugetDetailsViewModel"
  xmlns:reactiveui="http://reactiveui.net"
  xmlns="http://schemas.microsoft.com/winfx/2006/xaml/presentation"
  xmlns:x="http://schemas.microsoft.com/winfx/2006/xaml">
  <Grid>
      <Grid.ColumnDefinitions>
          <ColumnDefinition Width="Auto" />
          <ColumnDefinition Width="*" />
      </Grid.ColumnDefinitions>
      <Image x:Name="iconImage" Margin="6" Width="64" Height="64"
             HorizontalAlignment="Center" VerticalAlignment="Center"/>
      <TextBlock Grid.Column="1" TextWrapping="WrapWithOverflow"
                 Margin="6" VerticalAlignment="Center">
          <Run FontSize="14" FontWeight="SemiBold" x:Name="titleRun"/>
          <LineBreak />
          <Run FontSize="12" x:Name="descriptionRun"/>
          <LineBreak />
          <Hyperlink x:Name="openButton">Open</Hyperlink>
      </TextBlock>
  </Grid>
</reactiveui:ReactiveUserControl>
Then edit code-behind of the <font style="color:rgb(214, 51, 132);">NugetDetailsView</font>.
// The class derives off ReactiveUserControl which contains the ViewModel property.
// In our MainWindow when we register the ListBox with the collection of
// NugetDetailsViewModels if no ItemTemplate has been declared it will search for
// a class derived off IViewFor<NugetDetailsViewModel> and show that for the item.
public partial class NugetDetailsView
{
    public NugetDetailsView()
    {
        InitializeComponent();
        this.WhenActivated(disposableRegistration =>
        {
            // Our 4th parameter we convert from Url into a BitmapImage.
            // This is an easy way of doing value conversion using ReactiveUI binding.
            this.OneWayBind(ViewModel,
                viewModel => viewModel.IconUrl,
                view => view.iconImage.Source,
                url => url == null ? null : new BitmapImage(url))
                .DisposeWith(disposableRegistration);

            this.OneWayBind(ViewModel,
                viewModel => viewModel.Title,
                view => view.titleRun.Text)
                .DisposeWith(disposableRegistration);

            this.OneWayBind(ViewModel,
                viewModel => viewModel.Description,
                view => view.descriptionRun.Text)
                .DisposeWith(disposableRegistration);

            this.BindCommand(ViewModel,
                viewModel => viewModel.OpenPage,
                view => view.openButton)
                .DisposeWith(disposableRegistration);
        });
    }
}
This view will automatically get displayed in the ListBox in the MainWindow. When using Reactive Binding on XAML platforms, if no ItemTemplate has been set, it will look for a <font style="color:rgb(214, 51, 132);">IViewFor<T></font> inside our Dependency Injection and display the Item using that control. Notice we convert our URI above into a BitmapImage just for the OneWayBind. ReactiveUI allows us to quickly convert types which is much easier syntax than the XAML Value Converters.
Now you can search repositories on NuGet using your own app!

Create Views using traditional XAML markup bindings
If you would like to use XAML bindings (remember, they don’t guarantee type-safety and don’t provide tools for memory management, such as WhenActivated, but ReactiveUI bindings do), then this tutorial is for you.
The first thing you need to do is creating a converter, while we have a boolean property AppViewModel.IsAvailable indicating if our ViewModel has content loaded. Let’s create a new class <font style="color:rgb(214, 51, 132);">BoolToVisibilityConverter.cs</font>.
// If we would like to do value conversion using Binding markup extension,
// we need to implement the IValueConverter interface.
public class BoolToVisibilityConverter : IValueConverter
{
    public object Convert(object value, Type targetType, object parameter, CultureInfo culture)
    {
        // We need to convert True value to Visibility.Visible and False value to
        // Visibility.Collapsed. Then we need to declare the converter as a static resource.
        return (bool)value ? Visibility.Visible : Visibility.Collapsed;
    }

    public object ConvertBack(object value, Type targetType, object parameter, CultureInfo culture)
    {
        // Our app doesn't need to be able to convert values back, so we won't implement this.
        return Binding.DoNothing;
    }
}
Now we should initialize the DataContext of our MainWindow by assigning an instance of the AppViewModel to it. Go to <font style="color:rgb(214, 51, 132);">MainWindow.xaml.cs</font> and do this:
public partial class MainWindow
{
    public MainWindow()
    {
        InitializeComponent();
        DataContext = new AppViewModel();
    }
}
Finally, we need to create XAML markup for our app.
<Window x:Class="ReactiveDemo.MainWindow"
        xmlns="http://schemas.microsoft.com/winfx/2006/xaml/presentation"
        xmlns:x="http://schemas.microsoft.com/winfx/2006/xaml"
        xmlns:d="http://schemas.microsoft.com/expression/blend/2008"
        xmlns:mc="http://schemas.openxmlformats.org/markup-compatibility/2006"
        Title="NuGet Browser" mc:Ignorable="d" Height="450" Width="800">
    <Window.Resources>
        <ResourceDictionary>
            <!--
            Here we declare the value converter that we've implemented
            on the previous step. We will need it later to convert the
            IsAvailable boolean property to Visibility.
            -->
            <BooleanToVisibilityConverter x:Key="BoolToVisible" />
        </ResourceDictionary>
    </Window.Resources>
    <Grid Margin="12">
        <Grid.ColumnDefinitions>
            <ColumnDefinition Width="Auto" />
            <ColumnDefinition Width="*" />
        </Grid.ColumnDefinitions>
        <Grid.RowDefinitions>
            <RowDefinition Height="Auto" />
            <RowDefinition Height="*" />
        </Grid.RowDefinitions>
        <TextBlock FontSize="16"
                   FontWeight="SemiBold"
                   VerticalAlignment="Center"
                   Text="Search for: "/>
        <!--
        Here we create a two-way binding for the SearchTerm property
        of our ViewModel. When a user types something into the TextBox,
        value of the SearchTerm property will be updated automatically.
        Don't forget to set UpdateSourceTrigger to PropertyChanged on
        WPF and UWP platforms.
        -->
        <TextBox Grid.Column="1"
                 Margin="6 0 0 0"
                 Text="{Binding SearchTerm,
                                Mode=TwoWay,
                                UpdateSourceTrigger=PropertyChanged}"/>
        <!--
        Here we bind the IsAvailable property to ListView's Visibility
        using the value converter we've declared above. Also, we bind
        SearchResults list to ListView's ItemsSource.
        -->
        <ListBox Grid.ColumnSpan="3"
                 Grid.Row="1" Margin="0,6,0,0"
                 ItemsSource="{Binding SearchResults}"
                 HorizontalContentAlignment="Stretch"
                 ScrollViewer.HorizontalScrollBarVisibility="Disabled"
                 Visibility="{Binding IsAvailable,
                                      Mode=OneWay,
                                      Converter={StaticResource BoolToVisible}}">
            <ListBox.ItemTemplate>
                <DataTemplate>
                    <Grid>
                        <Grid.ColumnDefinitions>
                            <ColumnDefinition Width="Auto" />
                            <ColumnDefinition Width="*" />
                        </Grid.ColumnDefinitions>
                        <Image Margin="6" Width="64" Height="64"
                               Source="{Binding IconUrl, Mode=OneWay}"
                               HorizontalAlignment="Center"
                               VerticalAlignment="Center"/>
                        <TextBlock Grid.Column="1" Margin="6"
                                   TextWrapping="WrapWithOverflow"
                                   VerticalAlignment="Center">
                            <Run FontSize="14" FontWeight="SemiBold"
                                 Text="{Binding Title, Mode=OneWay}"/>
                            <LineBreak />
                            <Run FontSize="12" Text="{Binding Description, Mode=OneWay}"/>
                            <LineBreak />
                            <Hyperlink Command="{Binding OpenPage}">Open</Hyperlink>
                        </TextBlock>
                    </Grid>
                </DataTemplate>
            </ListBox.ItemTemplate>
        </ListBox>
    </Grid>
</Window>
Now you can search repositories on NuGet using your own app!
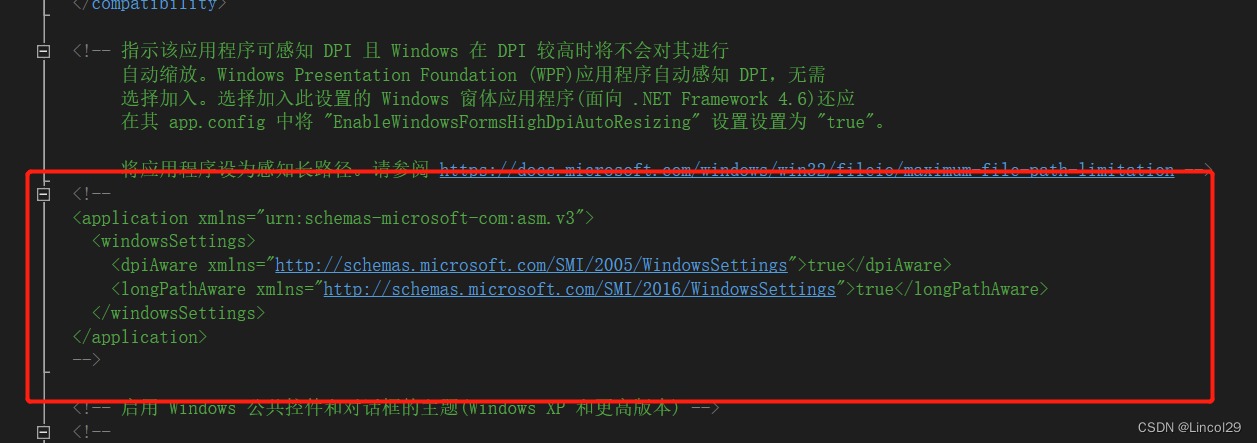
存在问题(已解决)
xmlns:rxui=”http://reactiveui.net”
<Window></Window>无法替换为<rxui:ReactiveWindow></rxui:ReactiveWindow>
提示rxui 中未找到ReactiveWindow的命名空间。
问题解决:
1、在MainWindow.xaml文件中,导入ViewModel \ rxui \ ViewModels 命名空间
xmlns:rxui="http://reactiveui.net"
xmlns:vm="clr-namespace:ReactiveDemo.ViewModels"
x:TypeArguments="vm:UserViewModel"
2、根节点改为
<rxui:ReactiveWindow>

</rxui:ReactiveWindow>
3、MainWindow.cs代码继承 ReactiveWindow
public partial class MainWindow:ReactiveWindow<UserViewModel>
此时VS编辑器仍然会报错,重新生成项目即可消除。

This tutorial can help me quickly get started with the Reactiveui framework. Thank you
I’d be very glad to be of help to you